
There are versions of XAMPP for Linux, Windows and the Mac OS X. XAMPP is installed and configured diffferently on each of these platforms due to the XAMPP revision included in the package and the quirks of the underlying OS. In this article I’ll cover how to setup XAMPP on the MacOS in order to get everything working properly.
Mac OS X Installation Procedure
Mac OS X Installation Procedure
- Download the latest XAMPP for Mac – 1.7.3 as of this writing – on the XAMPP MacOS X page.
- Open the DMG package and drag the XAMPP folder into your /Applications folder. All the XAMPP files are contained in the /Applications/XAMPP/xamppfiles folder with links to cgi-bin, htdocs, etc and logs folders.
- Start the Apache, MySQL and FTP servers by clicking on the button for each of these services in the XAMPP Contol Panel. Each of the service lights should show green like this:


- Open http://localhost in a browser. You should a get a browser window with the XAMPP for Mac OS X startup screen:


- At this point most of the setup work for XAMPP is done. However, if you plan to use phpyMyAdmin you’ll have to do a little further configuration to get it to work properly. Open phpMyAdmin by clicking on the phpMyAdmin link in the XAMPP window under Tools or enter http://locahost/phpmyadmin in your browser. You will be taken directly to the phpMyAdmin page with some messages at the bottom of the screen telling you that you have to deal with some configuration issues relate to the phpMyAdmin database and that a root password is not set for MySQL. Let’s deal with each of these problems.
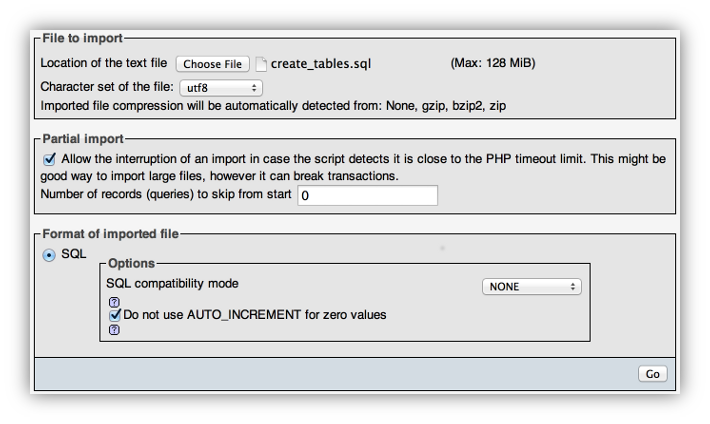
- XAMPP does not create all the tables that phpmyadmin needs so you have to do this with an SQL script that is enclosed with the package. To do this click on the Import tab in the toobar at the top of the screen.

- Click on the Choose button in the File to import section.

- Choose the create_tables.sql script in /Applications/XAMPP/xamppfiles/phpmyadmin/scripts folder.
- Click on the Go button in the Format of imported file to run the script which will add all the tables you need to the phpmyadmin database.
- Open /Applications/XAMPP/xamppfiles/phpmyadmin/config.inc.php in your editor of choice.
- Uncomment the following lines in the config.inc.php file.

$cfg['Servers'][$i]['pmadb'] = 'phpmyadmin'; $cfg['Servers'][$i]['bookmarktable'] = 'pma_bookmark'; $cfg['Servers'][$i]['relation'] = 'pma_relation'; $cfg['Servers'][$i]['table_info'] = 'pma_table_info'; $cfg['Servers'][$i]['table_coords'] = 'pma_table_coords'; $cfg['Servers'][$i]['pdf_pages'] = 'pma_pdf_pages'; $cfg['Servers'][$i]['column_info'] = 'pma_column_info'; $cfg['Servers'][$i]['history'] = 'pma_history';
- Add the following $cfg parameter to this list.
$cfg['Servers'][$i]['designer_coords'] = 'pma_designer_coords';
- Change $cfg['Servers'][$i]['auth_type'] from ‘config’ to ‘cookie which will create a login page for future phpmyadmin sessions.
$cfg['Servers'][$i]['auth_type'] = 'cookie';
- To set a root password for phpmyadmin click on the Privileges in the XAMPP Control Panel toolbar.


- Click on the edit icon in the column to the right on the User Overview table for the root account on localhost.

- Click on the Password radio button in the Change Password section of the Edit Privileges: User ‘root’@’127.0.0.1′page.


- Enter the new password then re-type the password.
- Click on the Go button to save the new password.
- Repeat steps 14 – 17 for root on 127.0.0.1.
- Close your browser then restart Apache and MySQL in the XAMPP Control Panel.
- Open phpMyAdmin in your browser. This time you’ll be take to a phpMyAdmin login screen.
- Login as root using password you set in step 17.
If everything went well you’ll go to the phpMyAdmin main screen and see a green Exit icon under the phpMyAdmin frame on the left side of the screen. You can now create other databases and tables with phpMyAdmin.
Source : http://vichargrave.com/how-to-install-xampp-on-mac-os-x-step-by-step/
No comments:
Post a Comment